In this chapter I shall outline the design of a new RISC OS module that implements a programmer's interface based upon a subset of Silicon Graphics' popular OpenGL graphics system. The subset of commands has been chosen mainly to provide facilities for games developers similar to the pseudo-standard "MiniGL"s found on other platforms, whilst avoiding duplication of existing RISC OS graphics capabilities.
Note that there is an important distinction between the design of my GL module and its functional specification, although within this chapter the boundaries between these concepts are not always clearly defined:
Another programmer may produce a module that conforms to the same functional specification (and hence is compatible with the same client programs), yet operates differently internally. For example, my module currently implements painter's algorithm, so the internal design features lots of buffering. This is not a stipulation of the functional specification, however.
The SWI specifications in this chapter have been adapted from more detailed descriptions in the programmer's guide. For the sake of brevity some of the standard (but dispensable) features of SWI documentation have been omitted:
Conceptually the GL module presents an immediate-mode interface, in that commands are executed in the order that they are issued, and the effects of one command must be fully realised before the effects of subsequent commands.
Unlike 2-D graphics plotting using the VDU drivers, however,
there may be an indeterminate delay between specifying
geometric data to the graphics library and the corresponding
graphics being drawn on the screen. This is used to advantage
by the painter's algorithm implementation, where the delay
would necessarily be infinite if the accumulated data were
not eventually flushed by a call to GL_Finish.
The GL module maintains a relatively large amount of data on its current state. This state information has a large influence on the effects of most commands, and indeed in some states certain groups of commands are unavailable.
A client program containing errors may get the module into an
indeterminate state such that calling SWIs generates
"Operation illegal in current state" errors. In this
situation the simplest course of action is to reset the
module: As with any other module this can be done by calling
OS_Module 3, or by typing "*RMReInit
GraphicsLibrary" at the command line.
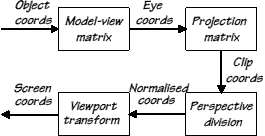
As the vertex coordinates specified to GL_Vertex
travel through the graphics pipeline, they are first
transformed to eye (world) coordinates by the current
model-view matrix, then transformed to clip (view volume)
coordinates by the current projection matrix. Clipping may
result in vertices being moved or deleted, before perspective
division and viewport transformation yield screen
coordinates.
An overview of the vertex transformation pipeline
The model-view and projection transformations are controlled
by the GL_Matrix... set of SWIs.
GL_MatrixMode controls whether subsequent matrix
commands affect the model-view or projection matrix. For each
matrix mode a stack of matrices is maintained, allowing the
current matrix to be saved with a call to
GL_PushMatrix and later restored by a corresponding
call to GL_PullMatrix.
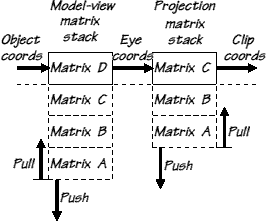
The model-view and projection matrix stacks, current matrices at the top
SWIs such as GL_MultMatrix,
GL_LoadIdentity and GL_LoadMatrix handle
basic matrix operations, whilst others provide a high-level
interface to common geometric transformations such as
rotation, scaling and translation.
Both parallel and perspective projections are supported,
being set up by calls to GL_Ortho and
GL_Frustum respectively.
Changes the current matrix and matrix stack used for subsequent matrix operations
R0 = new matrix mode (see table below)
This call changes the current matrix mode so that subsequent
matrix commands affect either the projection matrix or the
model-view matrix. Each matrix mode has its own matrix stack
and current matrix pointer (which may be controlled using
GL_PushMatrix and GL_PullMatrix).
| Value of R0 | Matrix mode |
| 0 | Model-view |
| 1 | Projection |
The current model-view matrix is used to transform object
(local) coordinates to eye (world) coordinates. You will
invariably want to be in model-view matrix mode when calling
SWIs such as GL_Rotate, GL_Scale
and GL_Translate.
The current projection matrix is used to transform eye
(world) coordinates to clip (view volume) coordinates. You
will invariably want to be in projection matrix mode when
calling SWIs such as GL_Ortho or
GL_Frustum.
Saves the current matrix on the stack and uses a duplicate in subsequent operations
--
This call pushes the matrix stack for the current mode down by one, saving the current matrix and duplicating it in the new matrix at the top of the stack.
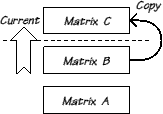
Matrix B is pushed onto the stack
As with other other matrix operations, the matrix stack
operated on depends on the current matrix mode (see
GL_MatrixMode).
Discards the current matrix and restores the previous stacked matrix
--
Pulls the current matrix from the top of the stack
(discarding it), and restores the matrix below (that was
saved by a previous call to GL_PushMatrix). If
you call GL_PullMatrix on a matrix stack with
only one entry then the error "Command would cause a stack
underflow" will be returned.
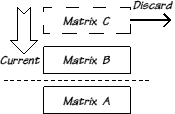
Matrix C is pulled from the stack
As with other other matrix operations, the matrix stack
operated on depends on the current matrix mode (see
GL_MatrixMode).
Replaces the current matrix with the identity matrix
--
The identity matrix (illustrated below) passes vertex coordinates unchanged through the graphics transformation pipeline. This is a sensible default to which both the model-view matrix and projection matrix are set when the graphic module is first initialised.

This SWI to resets the current matrix to the identity matrix.
Typically you would do this before a fresh sequence of
model-view transformations (with subsequent calls to
GL_Translate, GL_Rotate etc.) and before
setting up a new projection matrix by calling
GL_Ortho or GL_Frustum.
As with other other matrix operations, the matrix operated on
depends on the current matrix mode (see
GL_MatrixMode).
Replaces the current matrix with the specified matrix data
R0 = pointer to replacement 4×4 matrix
This SWI replaces the current matrix with a 4× 4 matrix loaded directly from the client program's memory, via a pointer passed in R0. The replacement matrix should be stored in column-major order, which is the opposite of the usual ordering for 2 dimensional arrays used by the C language. An example is given below to illustrate the correct matrix format:
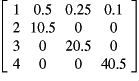
This example matrix would be stored in memory as an array of 16 consecutive values [1, 2, 3, 4, 0.5, 10.5, 0, 0, 0.25, 0, 20.5, 0, 0.1, 0, 0, 40.5]. Each element of the array occupies a 32-bit word, and holds a 2's complement signed value in fixed point q=16 format, meaning that 10.5 would be stored as 10.5*216.
You should try to avoid loading matrices directly where
possible - instead use calls such as
GL_Translate or GL_Rotate to set up
transformations and GL_Ortho or
GL_Frustum to set up projections. This will make your
code more readable and reduce the burden of parameter
translation for implementations that use a different numeric
format internally.
As with other other matrix operations, the matrix operated on
depends on the current matrix mode (see
GL_MatrixMode).
Multiplies the current matrix by the specified matrix data
R0 = pointer to 4×4 matrix to multiply by
This call multiplies the current matrix by the specified
matrix, and replaces the current matrix with the product. R0
should point to an array of 16 values, stored in column-major
order. For full details of the matrix format see the
documentation on GL_LoadMatrix.
If possible you should try to use a combination of named
transformation functions such as GL_Translate or
GL_Rotate instead of this call. Not only will
this make your code more readable, but it allows hidden
optimisation of many common transformation operations to be
done rather than literal 4×4 matrix
multiplications.
As with other matrix operations, the matrix operated on
depends on the current matrix mode (see
GL_MatrixMode).
Multiplies the current matrix by a matrix that produces an anti-clockwise rotation around the specified axis
R0 = angle of rotation (in degrees)
R1 = x component of vector
R2 = y component of vector
R3 = z component of vector
This call produces an anti-clockwise rotation around an arbitrary axis, the direction of which is specified in R1-R3 as a 3 dimensional vector. The concept of an axis of rotation is illustrated in the diagram below:
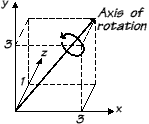
Rotation around an axis
The angle passed in R0 is treated as though it wraps around, if it is beyond 360° or less than 0° (e.g. -4° is treated as 356°). However it is better to specify angles in the range 0°-359° if possible, because these can be looked up directly in the internal sine and cosine tables.
Conceptually this SWI sets up the following general rotation
matrix and calls GL_MultMatrix.

In actuality, however, dedicated rotation routines are used. Particularly optimised routines can be used in cases where the rotation is around a single axis (e.g. any two components of the vector passed to the SWI are 0).
For instance, to do a simple rotation around the z axis only, set the magnitude of both x and y components of the directional vector to 0. The magnitude of the z component is immaterial in this context - any positive value will do.
|
As with other other matrix operations, the matrix operated on
depends on the current matrix mode (see
GL_MatrixMode).
Multiplies the current matrix by a general scaling matrix
R0 = x scale factor
R1 = y scale factor
R2 = z scale factor (all in fixed point q=16 form, e.g.
units of 1/65536)
This call sets up a matrix that produces a general scaling according to the specified parameters. The current matrix is multiplied by this scaling matrix, and replaced with the product.
Conceptually this SWI sets up the following general scaling
matrix and calls GL_MultMatrix.

In actuality, however, dedicated scaling routines are used. Particularly optimised routines can be used in cases where the scaling is only in one axis (e.g. any two of the scale factors passed to the SWI are 1× 216).
As with other other matrix operations, the matrix operated on
depends on the current matrix mode (see
GL_MatrixMode).
Multiplies the current matrix by a general translation matrix
R0 = x component of vector
R1 = y component of vector
R2 = z component of vector (all in fixed point q=16 form,
e.g. units of 1/65536)
This call sets up a matrix that produces a translation by the specified vector.The current matrix is multiplied by this translation matrix, and replaced with the product.
Conceptually this SWI sets up the following general
translation matrix and calls GL_MultMatrix.

In actuality, however, dedicated translation routines are used. Particularly optimised routines can be used in cases where the translation is only along one axis (e.g. any two components of the vector passed to the SWI are 0).
As with other other matrix operations, the matrix operated on
depends on the current matrix mode (see
GL_MatrixMode).
Multiplies the current matrix by a matrix that produces a parallel projection
R0 = left edge
R1 = right edge
R2 = bottom edge
R3 = top edge
R4 = near clipping plane
R5 = far clipping plane
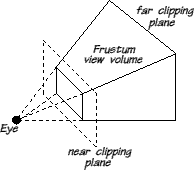
This SWI sets up a matrix that produces a parallel projection, to transform coordinates from a defined view volume in 3D world space onto the flat viewport.
The position and dimensions of this parallelpiped view volume are specified by the SWI parameters: R0-R3 give the position and dimensions (in eye coordinates) of the viewport, as mapped to the near clipping plane. R4 and R5 give the distances from the projection reference point ('eye') to the near and far clipping planes, respectively.
If bad parameters are detected, e.g. if ![]() or
or ![]() or
or ![]() , then this SWI will return the error "Numeric argument
out of range", leaving the current matrix unchanged.
, then this SWI will return the error "Numeric argument
out of range", leaving the current matrix unchanged.
A view volume for a parallel projection is illustrated in the diagram below:
Parallel projection
The projection is 'parallel' because world coordinates are transformed to the view plane along parallel lines. Only orthographic parallel projections are supported (where the projection is perpendicular to the view plane) - you cannot specify an oblique projection.
The distances to the near and far clip planes (e.g. the front and back of the view volume) are used in mapping world coordinates to depth values in a Z-buffer. The specified left, right, top and bottom edges are used in mapping world coordinates to viewport coordinates. Unless the sides of the view volume have a similar aspect ratio to the viewport then graphics will appear 'squashed' or 'stretched' when mapped from 3-D space to the screen.
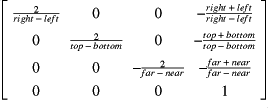
The transformation matrix created by this SWI according to the given parameters is as follows:
The current matrix is multiplied by this projection matrix,
and the product replaces the existing matrix. You should
probably call GL_LoadIdentity to flush any
previous projection matrix before calling this SWI.
As with other other matrix operations, the matrix operated on
depends on the current matrix mode (see
GL_MatrixMode). This mode should almost certainly be
'projection', so that the projection matrix is set up rather
than corrupting the current model-view matrix.
Multiplies the current matrix by a matrix that produces a perspective projection
R0 = left edge
R1 = right edge
R2 = bottom edge
R3 = top edge
R4 = near clipping plane
R5 = far clipping plane
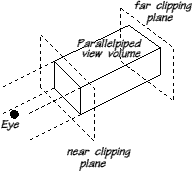
This SWI sets up a matrix that produces a perspective projection, that will transform coordinates from a truncated pyramidal view volume in 3-D world space onto the flat viewport.
The position and dimensions of this frustum view volume are specified by the SWI parameters: R0-R3 give the position and dimensions (in eye coordinates) of the viewport, as mapped to the near clipping plane. R4 and R5 give the distances from the projection reference point ('eye') to the near and far clipping planes, respectively.
If bad parameters are detected, e.g. ![]() or
or ![]() or
or ![]() or
or ![]() or
or ![]() , then this SWI will return the error "Numeric
argument out of range", leaving the current matrix unchanged.
, then this SWI will return the error "Numeric
argument out of range", leaving the current matrix unchanged.
A view volume for a perspective projection is illustrated in the diagram below:
Perspective projection
Graphics primitives that fall outside the boundary edges of
the view volume (as specified by this command or
GL_Ortho) are discarded and those partly outside are
clipped.
The specified left, right, top and bottom edges are used in mapping world coordinates to viewport coordinates. Unless the sides of the view volume have a similar aspect ratio to the viewport then graphics will appear 'squashed' or 'stretched' when mapped from 3-D space to the screen.
The distances to the near and far clip planes (e.g. the front
and back of the view volume) are used in mapping world
coordinates to depth values in a Z-buffer. Unlike in an
orthographic projection (see GL_Ortho), the
distance to the near clipping plane (given in R4) affects the
appearance of projected graphics. The closer the view plane
is to the projection reference point, the more perspective
effects will be emphasised; the difference in size between
near and far objects becomes exaggerated. Conversely, with a
very distant view plane the perspective projection will
become more similar to a parallel projection.
The transformation matrix created by this SWI according to the given parameters is as follows:
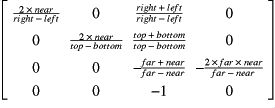
The current matrix is multiplied by this projection matrix,
and the product replaces the existing matrix. You should
probably call GL_LoadIdentity to flush any
previous projection matrix, before calling this SWI.
As with other other matrix operations, the matrix operated on
depends on the current matrix mode (see
GL_MatrixMode). This mode should almost certainly be
'projection', so that the projection matrix is set up rather
than corrupting the current model-view matrix.
Example:
|
Vertices are sent to the GL module using the
GL_Vertex SWI to specify object coordinates in 3
dimensions. The current colour and normal vector are
associated with each new vertex as shown in the diagram
below. The way in which geometric primitives are constructed
from vertices is discussed later.
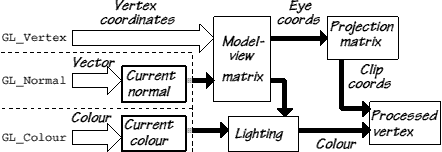
Processing of incoming vertices and association of auxiliary data
Sends a vertex to the GL, with specified coordinates and current auxiliary data
R0 = x coordinate of vertex
R1 = y coordinate of vertex
R2 = z coordinate of vertex
This SWI is part of the system of geometric data
specification. Invoking this SWI outside of a
GL_Begin/GL_End pair will result in the
error "Operation illegal in current state".
Calling GL_Vertex sends a vertex to the GL for
use in primitive assembly, given the three dimensional object
(local) coordinates specified in R0-R2. The new vertex also
picks up the current values of auxiliary vertex data such as
the current colour and normal vector (see
GL_Colour and GL_Normal).
The role of a given vertex in primitive construction is
dictated by the mode value passed to GL_Begin at
the beginning of geometry specification. An individual vertex
may or may not spawn a graphics primitive, depending on the
current mode and state. For further details see the
documentation on GL_Begin.
To reduce the number of calls required to specify a sequence
of vertices and their auxiliary data you can also specify an
array of vertex coordinates to be read sequentially - see
GL_VertexPointer.
Sets the current colour, as used in associating auxiliary data with vertices
R0 = palette entry (BBGGRR00 24-bit colour word)
Vertex colours are specified in terms of red, green and blue components, with 8 bits of accuracy for each. Conceptually this gives 16.7 million possible colours, although the colours actually displayed are only the best approximation in the current screen mode and palette.
![]()
Format of a palette entry
The RGB values are packed into a 32-bit colour word in the standard 'palette entry' format used by other RISC OS components such as ColourTrans and the colour picker. For compatibility with future versions of the GL module you should set the bottom 8 bits of the palette entry to zero, since these are likely to be used for an alpha (transparency) value.
The graphics library maintains a current RGB colour (initial
value [255,255,255] e.g. white) which may be changed by
calling this SWI. Like other auxiliary vertex data, the
current colour is immediately associated with each vertex
specified using GL_Vertex or
GL_ArrayElement and may be altered for subsequent
vertices.
To reduce the number of calls required to specify a sequence
of vertices and their auxiliary data you can also specify an
array of colour data to be read sequentially - see
GL_ColourPointer.
Sets the current normal, as used in associating auxiliary data with vertices
R0 = x component of vector
R1 = y component of vector
R2 = z component of vector
A normal is a three dimensional vector (specified as x, y, z components) that is used in lighting calculations for a vertex23. Rather than automatically calculating a normal vector perpendicular to each polygon surface, normals are associated with individual vertices.
The graphics library maintains a current normal vector
(initial value [0,0,1]) which may be changed by calling this
SWI. Like other auxiliary vertex data, the current normal is
immediately associated with each vertex specified using
GL_Vertex or GL_ArrayElement and
may be altered for subsequent vertices.
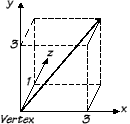
Illustration of the normal vector [3,3,1]
To reduce the number of calls required to specify a sequence
of vertices and their auxiliary data you can also specify an
array of normal vectors to be read sequentially - see
GL_NormalPointer.
The basic method of specifying object geometry is to send
vertex data to the GL between calls to GL_Begin
and GL_End. Vertex coordinates are specified by
calling GL_Vertex, and auxiliary data by
GL_Normal and GL_Colour. The
interpretation of this sequence of vertex data and the type
of graphics primitives produced is governed by the current
primitive construction mode, as specified to
GL_Begin.
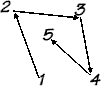
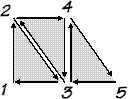
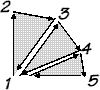
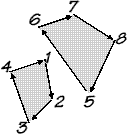
It is common for objects to have vertices that are shared by more than one edge. In order to economise on multiple specification and transformation of these shared vertices, various of the construction modes produce interconnected primitives. The following diagram illustrates sharing of vertices between triangle primitives in triangle strip mode:
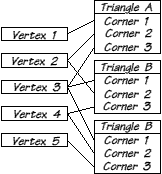
The order in which vertices are specified is extremely important. The diagrams below illustrate the correspondence between order of vertex specification and output primitives produced, for different primitive construction modes.
| Primitive construction modes | ||||
|

|

|
|
|
| 1) Connected line strip | 2) Connected line loop | 3) Individual line segments | 5) Connected triangle strip | |
|
|

|
|
|
| 6) Connected triangle fan | 7) Separate triangles | 8) Connected quadrilateral strip | 9) Separate quadrilaterals | |
Note that the order of vertex specification (as indicated by the vertex numbering) does not necessarily correspond to the direction of the arrowed lines, which show the 'direction' of the edges produced (e.g. the internal ordering of corner vertices).
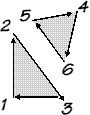
Polygon edges must be in clockwise orderwhen looking at the 'front' face, or else the surface will be treated as back-facing and culled.
For individual polygons (separate quads or separate triangles) this simply means that vertices should be specified in clockwise order - for more complex construction modes you must refer to the diagrams above. All the polygons illustrated are front-facing.
Opening command in Begin/End paradigm of primitive construction
R0 = primitive construction mode (see table below)
All geometric objects are specified to the graphics library
as a number of vertices (specified by calls to
GL_Vertex) enclosed between calls to to this SWI and
GL_End. The construction mode passed in R0
determines how graphics primitives are produced from the
sequence of input vertices:
| Value of R0 | Primitive construction mode |
| 0 | Individual points |
| 1 | Connected line strip |
| 2 | Connected line loop |
| 3 | Individual line segments |
| 4 | Reserved for future expansion |
| 5 | Connected triangle strip |
| 6 | Connected triangle fan |
| 7 | Separate triangles |
| 8 | Connected quadrilateral strip |
| 9 | Separate quadrilaterals |
Other values of R0 are reserved for future expansion, and attempts to use them will result in an "ENUM argument out of range" error.
Only commands that specify vertices (GL_Vertex,
GL_ArrayElement) or associated data
(GL_Colour, GL_Normal) are legal
between calling this SWI and the corresponding call to
GL_End. Attempts to call other graphics library SWIs
will result in the error "Operation illegal in current
state", as will calling this SWI where GL_Begin
has been called previously without any corresponding call to
GL_End.
Closing command in Begin/End paradigm of primitive construction
--
This SWI is part of the system of geometric data
specification - it signals the end of primitive construction.
Calling this SWI without having previously called
GL_Begin will result in the error "Operation illegal
in current state".
Having called GL_End, it once more becomes legal
to call SWIs not connected with primitive construction - e.g.
to change the model-view matrix for a different object.
Because the Begin/End method of geometry specification can be
quite costly in terms of the overhead of making multiple SWI
calls, an alternative method of primitive specification is
also provided: Vertex coordinates and associated data can be
stored in vertex arrays supplied by the client. The location
and format of these arrays can be set to one of various
predefined configurations by calling
GL_InterleavedArrays or separately by calling
GL_VertexPointer, GL_ColourPointer and
GL_NormalPointer. Vertices can be transferred
from the arrays individually by calling
GL_ArrayElement or sequentially by calling
GL_DrawArrays and GL_DrawElements. Again,
the production of graphics primitives from vertices is
controlled by the current primitive construction mode.
A generic command for enabling various graphics library features
R0 = feature to enable (see table below)
Together with GL_Disable, this call allows
client applications a generic method of controlling the
graphics library. The feature to be enabled depends upon the
value passed in R0:
| Value of R0 | Meaning |
|---|---|
| 0 | Reserved for future expansion |
| 1 | Colours vertex array |
| 2 | Coordinates vertex array |
| 3 | Normals vertex array |
| 4 | Reserved for future expansion |
| 5 | Reserved for future expansion |
| 6 | Flat shading of polygons |
Other values of R0 are reserved for future expansion, and will produce an "ENUM argument out of range" error in current versions of the graphics library.
Specific vertex arrays must be enabled using this SWI before
calls to GL_ArrayElement,
GL_DrawArrays or GL_DrawElements will
transfer data from those arrays for primitive specification.
Vertex arrays may also be automatically enabled/disabled by
GL_InterleavedArrays.
If 'flat shading' is turned on then all vertices of a primitive are assigned the colour of the vertex that caused that primitive to be spawned (i.e. the third vertex of a triangle, the fourth of a quadrilateral etc.) Thus the colour of the rasterised surface is uniform (or 'flat'), rather than being the result of interpolation between the colours of different vertices.
A generic command for disabling various graphics library features
R0 = feature to disable (see GL_Enable)
Together with GL_Enable, this call allows client
applications a generic method of controlling the graphics
library. The feature to be disabled depends upon the value
passed in R0 (see table of R0 values for
GL_Enable).
Specifies the location and organisation of an array of vertex coordinates
R0 = data type of array values (see table)
R1 = stride between array elements (in bytes)
R2 = pointer to first array element
This call specifies the location and organisation of an array
of vertex coordinates, for subsequent use in all vertex array
SWIs such as GL_ArrayElement,
GL_DrawArrays and GL_DrawElements.
The value passed in R0 indicates the type of values in the coordinates array:
| Value of R0 | Meaning |
|---|---|
| 3 | Signed bytes |
| 4 | Signed 16-bit integers |
| 5 | Signed 32-bit integers (word aligned) |
Other values of R0 are reserved for future expansion, and attempts to use them will result in an "ENUM argument out of range" error.
The 'stride' parameter passed in R1 is the number of bytes
between each element in the vertex array. The stride is
variable in order to allow the coordinate array to be
interleaved with other vertex arrays (see
GL_InterleavedArrays).
Before values can be read from a coordinate array specified
using this SWI, the coordinate array must be enabled by
calling GL_Enable,2.
Specifies the location and organisation of an array of colour data
R0 = data type of array values (see table)
R1 = stride between array elements (in bytes)
R2 = pointer to first array element
This call specifies the location and organisation of an array
of RGB colours, for subsequent use in all vertex array SWIs
such as GL_ArrayElement,
GL_DrawArrays and GL_DrawElements.
The colours in the array pointed to by R2 must be stored in
the same packed 32-bit word 'palette entry' format as that
described in the documentation on GL_Colour. For
future compatibility a value of 0 should be passed in R0 as
the 'data type'.
The 'stride' parameter passed in R1 is the number of bytes
between each element in the normal array. The stride is
variable in order to allow the colour array to be interleaved
with other arrays (see GL_InterleavedArrays).
Before values can be read from a colour array specified using
this SWI, the colour array must be enabled by calling
GL_Enable,1.
Specifies the location and organisation of an array of normal vector data
R0 = data type of array values (see table)
R1 = stride between array elements (in bytes)
R2 = pointer to first array element
This call specifies the location and organisation of an array
of normal vectors, for subsequent use in all vertex array
SWIs such as GL_ArrayElement,
GL_DrawArrays and GL_DrawElements.
The value passed in R0 indicates the type of values in the normal array:
| Value of R0 | Meaning |
|---|---|
| 3 | Signed bytes |
| 4 | Signed 16-bit integers |
| 5 | Signed 32-bit integers (word aligned) |
Other values of R0 are reserved for future expansion, and attempts to use them will result in an "ENUM argument out of range" error.
The 'stride' parameter passed in R1 is the number of bytes
between each element in the normal array. The stride is
variable in order to allow the normal array to be interleaved
with other arrays (see GL_InterleavedArrays).
Before values can be read from a normal array specified using
this SWI, the normal array must be enabled by calling
GL_Enable,3.
Efficiently initialises the arrays of vertex data to pre-defined configurations
R0 = format of interleaved array data (see below)
R1 = stride between array elements (in bytes)
R2 = pointer to interleaved arrays
This call efficiently initialises the arrays of vertex data to one of a number of pre-defined configurations:
| R0 | Element size | Interleaved arrays format |
| 0 | 12 bytes | 3 words: [x coord, y coord, z coord] |
| 1 | 8 bytes œ | 3 shorts: [x coord, y coord, z coord] |
| 2 | 16 bytes | 4 words: [BGR colour, x coord, y coord, z coord] |
| 3 | 12 bytes œ | 1 word, 3 shorts: [BGR colour, x coord, y coord, z coord] |
| 4 | 24 bytes | 6 words: [normal x, y, z, coordinates x, y, z] |
| 5 | 12 bytes | 6 shorts: [normal x, y, z, coordinates x, y, z] |
| 6 | 28 bytes | 7 words: [BGR colour, normal x, y, z, coordinates x, y, z] |
| 7 | 16 bytes | 1 word, 6 shorts: [BGR colour, normal x, y, z, coordinates x, y, z] |
Other values of R0 are reserved for future expansion, and attempts to use them will result in an "ENUM argument out of range" error. Element sizes marked with œ have been rounded up so that subsequent entries are word aligned.
The 'stride' parameter passed in R1 is the number of bytes
between each element in the interleaved arrays (e.g. the
second parameter passed to GL_ColourPointer
GL_VertexPointer and
GL_NormalPointer) . If the value of R1 is 0 then the
stride is taken from the element size given in the table
above.
As well as setting the colour/normal/coordinate array
pointers depending on the specified interleaved array format,
this SWI also enables or disabled the relevant arrays as
though GL_Enable/GL_Disable had
been called. In summary, the effect of the command
|
is equivalent to the effect of the following command sequence24:
|
Defines a vertex by transferring a single element from every enabled array
R0 = element index
This SWI is part of the system of geometric data
specification. Invoking this SWI outside of a
GL_Begin/GL_End pair will result in the
error "Operation illegal in current state".
Calling GL_ArrayElement defines a vertex for use
in primitive assembly, by transferring a single element from
each enabled array (coordinate/normal/colour). The array
element to transfer is specified by the index passed in R0.
If the colour and normal arrays are enabled then the current
vertex colour and normal are set first, as though
GL_Colour and GL_Normal had been called
for the specified element from each array. Then, if the
vertex array is enabled, it is as though
GL_Vertex were called with the coordinates transferred
from the equivalent vertex array element, and the auxiliary
normal and colour.
For details of vertex specification and subsequent processing
see the documentation on GL_Begin and
GL_Vertex.
Constructs a sequence of primitives using array elements in a specified range
R0 = primitive construction mode (see GL_Begin)
R1 = index of first array element
R2 = number of elements in range
This call constructs a sequence of geometric primitives using vertex array elements in the specified range, taken from those of those coordinate/colour/normal arrays that are enabled.
The value passed in R0 for primitive construction mode is
interpreted in exactly the same way as the mode parameter to
GL_Begin. For details of primitive construction
modes see the documentation on that SWI.
Conceptually, the effect of the command
|
is the same as the effect of the following command sequence:
|
However, calling GL_DrawArrays is considerably
more efficient than the client program code given above,
because the SWI calling overhead of invoking
GL_ArrayElement many times over is eliminated. Use of
this SWI also makes client programs more succinct.
Constructs a sequence of primitives using only those vertex array elements specified by an associated array of indices
R0 = primitive construction mode (see GL_Begin)
R1 = number of indices
R2 = data type of array of indices (see table)
R3 = pointer to array of indices
This SWI constructs a sequence of geometric primitives using only those elements of the coordinate/colour/normal arrays that are specified in the array of indices pointed to by R3. The number of indices to read from this index array is passed in R1, and the numeric type of the index values is passed in R2:
| Value of R2 | Meaning |
|---|---|
| 0 | Unsigned bytes |
| 1 | Unsigned 16-bit integers |
| 2 | Unsigned 32-bit integers (word aligned) |
Other values of R2 are reserved for future expansion, and attempts to use them will result in an "ENUM argument out of range" error.
As with the SWIs GL_Begin and
GL_DrawElements, R0 contains the mode of primitive
construction to be used in processing the resultant sequence
of vertices. For full details of mode values for this
parameter see the documentation on GL_Begin.
Conceptually, the effect of the command
|
is the same as the effect of the following command sequence25:
|
Like GL_DrawArrays, this SWI has been provided
to make client programs more succinct, and to economise on
the calling overhead that would inevitably be incurred by
invoking GL_ArrayElement many times over, as
shown in the program code above.
The GL module will integrate with the existing graphics system as far as possible, in that (like the Font Manager and Draw module) it uses the VDU drivers' coordinate system and graphics origin where appropriate, and does not render outside the boundaries of the current graphics window.
All screen modes with colour depths of 8 bits per pixel or greater will be supported, at any pixel resolution. Attempting to render to 1/2/4bpp modes will generate the error "Cannot plot in this screen mode". In any case, since a 24-bit colour system is used both for colour specification and internally (old-style GCOLs are not supported), colour reproduction in such screen modes would probably be very poor.
The raster subsystem of the library will support points and plain or gouraud shaded triangles and lines. In future versions it is intended to extend these basic facilities to include texture mapping and other advanced rendering options.
Specifies a window within which graphics output will be drawn
R0 = x coordinate of left edge
R1 = y coordinate of bottom edge
R2 = width of viewport
R3 = height of viewport
The viewport is a rectangular area of the screen to which the GL will output graphics. By default it occupies the whole screen area but you can call this SWI to alter its position and dimensions. The parameters to this call are interpreted as OS coordinates relative to the current graphics origin.
Upon mode change the GL viewport is reset so that it occupies the whole screen once more.
Transformed coordinates are scaled to fill the current
viewport, so radically changing the shape of the viewport
compared to the shaped of the view volume (as defined by
GL_Ortho or GL_Frustum) will result
in stretched or squashed images.
It is important to understand that the graphics library's viewport is a completely separate entity from the VDU drivers' graphics window. Whereas the graphics window is a clipping window, the GL viewport is a positional window that controls the transformation to screen coordinates (more analogous, in fact, to the VDU graphics origin).

Only the shaded area will be painted
Most of the time you will want them to occupy the same area. However, if you were to define the graphics window and GL viewport to occupy non-overlapping areas of the screen then no visible output would be generated.
Note: As with the VDU drivers' graphics window, changing the
graphics origin subsequent to calling
GL_Viewport (e.g. using VDU 29) does not
affect the position of the viewport on the screen.
Does not return until all previous commands have been completed
--
This call causes the effects of all previous commands to be fully realised, causing any buffered graphics to be painted to the screen. It does not return control to the client program until this has taken place.
Calling GL_Finish may cause a large amount of
pending work to be done, or on an immediate-effect system it
may return immediately. When using painter's algorithm (see
*GLDepthMode), all graphics plotting is
delayed until this SWI is called. In general, therefore,
client programs should not assume that any graphics
have been plotted until they call GL_Finish.
After calling GL_Finish the graphics library
starts a 'clean sheet', in that the rasterisation of
primitives subsequently specified is unaffected by previously
specified primitives. In 'painter' depth mode
this implies an empty render buffer, whilst in
'zbuffer' mode it implies clearing the
z-buffer26.
Integral to the design of the GL module is the fact that it should be possible to multiply-instantiate it, since this will be the recommended method for applications running under the Window Manager to implement private rendering contexts.
To create a new instantiation, a client program calls the
standard OS_Module 14 SWI with a unique name for
its instantiation. Whenever control is returned to the client
program via Wimp_Poll, it should call
OS_Module 16 to set its own as the currently preferred
instantiation. On exit or in the event of a fatal error, it
is the client's responsibility to ensure that it kills its
private GL instantiation (using OS_Module 4).
The following example BASIC program illustrates these points, as well as a method of ensuring that each client's private instantiation has a unique name:
|
23 Since lighting calculations are not yet supported in this version of the graphics library, the usefulness of this SWI at the present time is moot.
24 It
is assumed that interleaved_arrays% points to a
block of memory in the format indicated by the '7' parameter
passed to GL_InterleavedArrays in R0.
25 It
is assumed that indices% points to a block of
memory containing unsigned integer values, as indicated by
the the '2' parameter passed to
GL_DrawElements. The indices cannot be stored in a
true BASIC array, since array references are illegal as SWI
parameters.
26 In
clearing the z-buffer, the GL_Finish SWI acts as
an amalgam of the OpenGL commands
glClearDepth(1.0) and
glClear(DEPTH_BUFFER_BIT), as well as the obvious
parallel to glFinish().